- Get link
- Other Apps
How to make embroidery frame stand - The art of embroidery began thousands of years in the past. Early examples might be found all around the world. There's historic embroidery from Egypt, Northern Europe and China. The place and how it really started will stay a thriller. What we do know is that in Europe, embroidery was a standing symbol. The usage of a needle and thread in order to sew patterns on cloth was a sign of wealth and prosperity. It was considered a woman's work. Many royal and noble women spent hours embroidering. They embroidered all the things, from tapestries to coats. These wealthy and powerful ladies had been typically depicted in portraits with their embroidery frame or other tools used for the craft. Many different cultures share Europe's use of embroidery as marking wealth and prestige. Persia, India, Japan and China also have richly embroidered fabrics. These had been celebrated material and those who made them were artisans of high caliber.
There are two major methods to save a stabilizer. The first is thru pre-planning, hooping your stabilizer just a little differently than ordinary, and the second is using leftover scraps of stabilizer after it has been used for embroidery. How you cut and hoop your stabilizer can extend the number of embroideries you possibly can sew out, saving you cash. When reducing your unique piece of both reduce away or tear away to place in your hoop, minimize it the size you need in a single dimension, both size or width, but much longer in the other dimension. For instance, in case you are chopping an 8-inch huge piece for a 4x4 hoop, chances are you'll lower the stabilizer 8" x 24". Embroider the first design at one end. After neatly cutting or tearing the stabilizer away from the finished design, re-hoop on the similar finish for your subsequent design, beginning just past the torn part. You might must press the stabilizer utilizing a dry iron on low temperature in between hoopings if it is wrinkled. Now you'll be able to reuse extra of the stabilizer, presumably having the ability to sew out 4 (4) embroideries, relying on their measurement, from the one piece, instead of the three (3) embroideries you would get by cutting three pieces 8"x8". Take this idea to the acute, and do not reduce your length off in any respect. Hoop your stabilizer, leaving the roll hooked up toward the highest of the ring. Place the roll behind the machine, out of the way of the ring, embroidery arm, or any threads. After the embroidery is complete, tear the stabilizer away, press the wrinkles out, and hoop once more at the forefront.
See more ideas about needlework framed cross stitch cross stitch. Glue a 3 cm piece at the top of the stand.

Embroidery Stand Penguin Stitching Frame Cross Stitch Etsy Framed Cross Stitch Diy Embroidery Hoop Stand Framed Embroidery
You can pretty much set up a floor stand anywhere it will fit and the only thing you need to bring to it is a chair and your stitching stuff.

How to make embroidery frame stand. Pull the fabric taut against the sides of your embroidery frame with your fingers. Apr 18 2014 - Dempsey Woodworking - Needlepoint Stand. One hand is above the embroidery and one hand is below.
Replace the frame backing flip it over and admire your handiwork. The trestles are set up usually just about wide enough to have a chair positioned between each stand. Finish the lacing by folding the fabric from the short sides back over into the middle and lacing it together.
Glue a 45 cm piece above that and stick at second 85 cm piece directly above. The frame is also designed to easily dismantle so people doing embroidery work can take the frame. Diy Embroidery Stand Embroidery Tools Tambour Embroidery Wooden Sewing Box How To Make Frames Floor Framing Frame Stand Frame.
StitchMaster Floor Stand very useful and handy for us cross stitchers and tapestry enthusiasts. Not pictured Sonata embroidery hoop that sits on a table-shaped slightly different but looks super sturdy this has happy customers. Remove the pins and the fit the embroidery board inside the frame.
How to make an embroidery hoop stand. Trestle stands are designed to hold the slate frame so that the embroiderer has both hands free. Elbesee embroidery stand that clamps to a table this would be really handy if you have a craft desk or cutting table.
Make sure that the 85 cm and 90 cm pieces are at right angles. Tie off the thread at the end and start a new piece. Embroidery frame stand.
A floor stand rests in front or to the side of you and holds your needlework frame or hoop up in front of you while you stitch. Press the pieces together and let the glue dry a little bit before glueing the remaining 2 90 cm pieces on top. Secure it in place with a large rubber band or a loop of elastic.
And then the fun of embroidery. This allows the slate frame to be at a comfortable height while stitching. Embroidery Cross Stitch Scroll Frame - YouTube.
A rubber band is usually sufficient for smaller frames like canning jar lids but larger frames may require you to cut a piece of. Beechwood embroidery footed frame that sits on a table this looks like a piece of art. How to make a needlepoint stand.
Apr 10 2020 - Explore Aya Siennas board Needlework Frames Stands DIY Ideas on Pinterest. This is an embroiderers knight in shining armor a true work horse and fatigue saver. This video is about my new hoop stand It would be a wonderful experience to have your hands free while doing embroidery.
The embroidery state frames with trestle stands are designed so that the top rail is adjustable. Then the dressed slate frame is placed over the rails of the trestle stand.

Embroidery Stand Stork Stitching Frame Cross Stitch Frame Embroidery Frame Tapestry Holder Tapestry Frame Floor Stand Frame Holder Diy Embroidery Frame Framed Cross Stitch Framed Embroidery

Embroidery Hoop Stand Diy Embroidery Hoop Stand Diy Embroidery Stand Embroidery Hoop

Diy Cross Stitch Frame Youtube Cross Stitch Diy Cross Stitch Framed Cross Stitch

Frames And Trestles The Unbroken Thread Ikea Towels Tambour Beading Diy Frame

Pin On Crafts

Diy Embroidery Frame Stand Nails N Needles Youtube Diy Embroidery Frame Diy Embroidery Stand Diy Embroidery
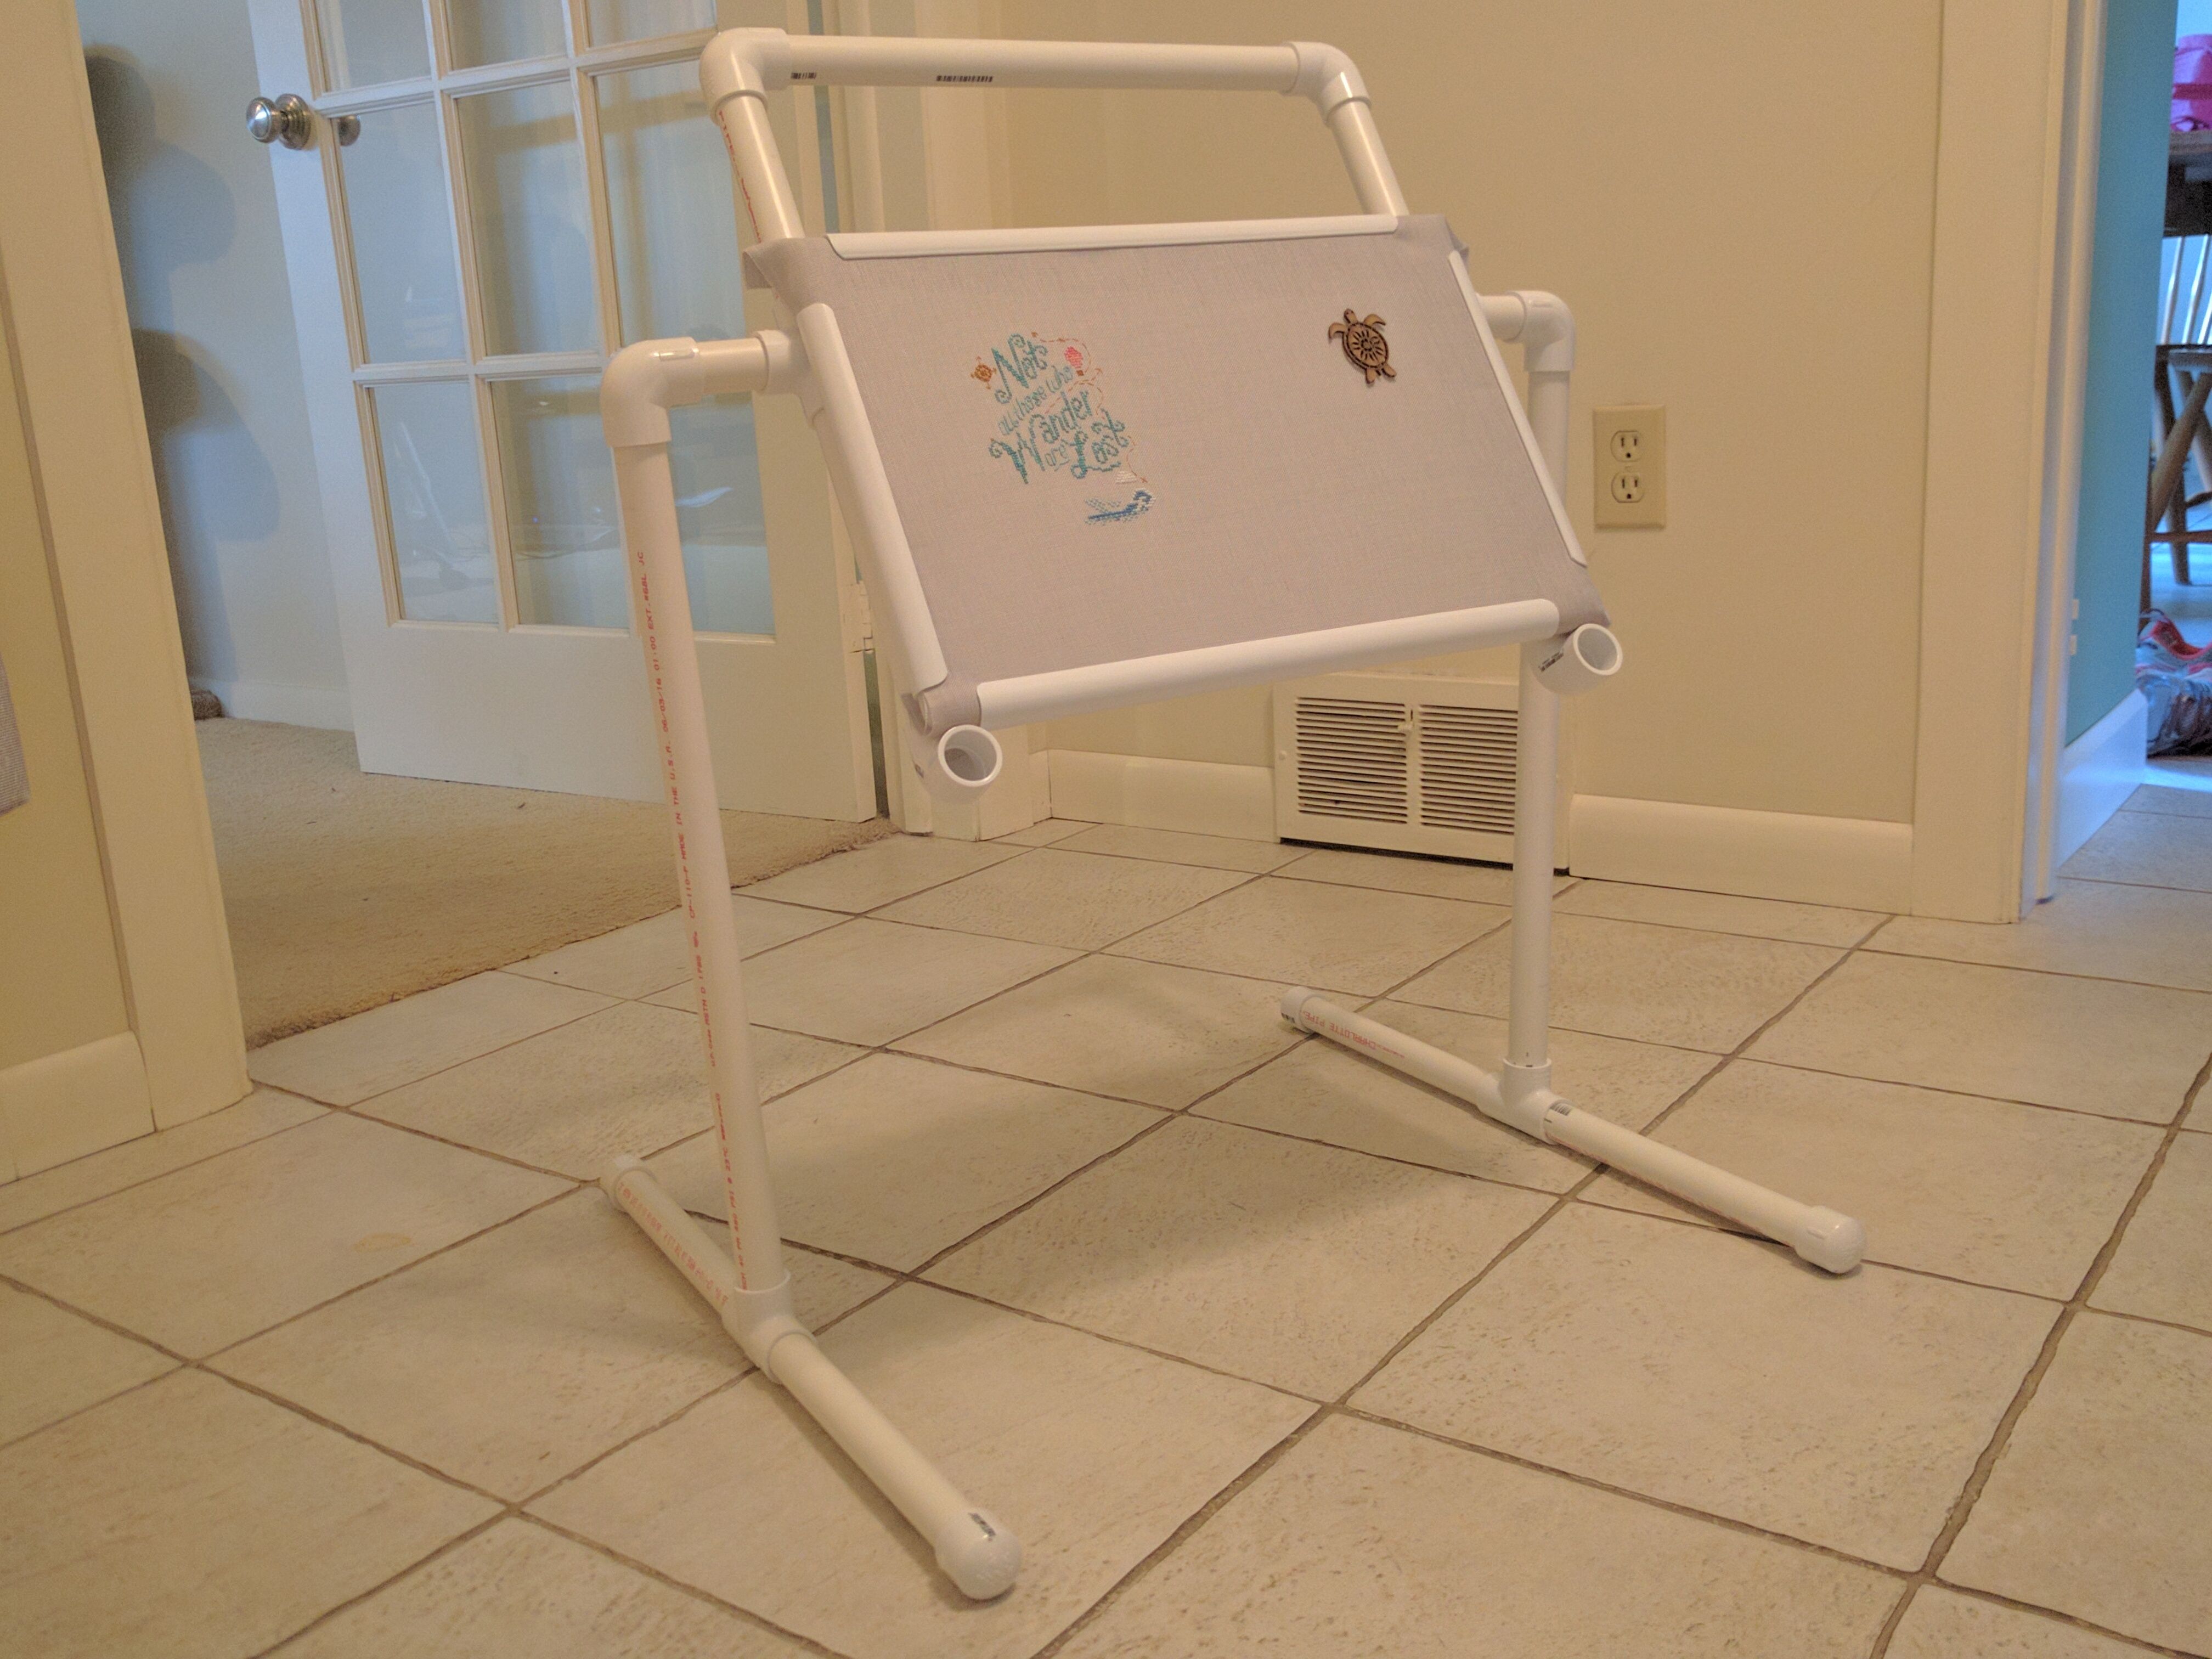
Diy Needlework Lap Stand Pvc Build Imgur Cross Stitch Tutorial Framed Cross Stitch Diy Cross Stitch

Diy Embroidery Frame Woodworking Plans And Projects Woodarchivist Com Woodworking Furniture Plans Diy Embroidery Frame Woodworking Projects That Sell

11 Embroidery Hoop Stand Options Embroidery Hoop Hand Quilting Frames Quilting Frames

Embroidery Hoop Stand Etsy Diy Embroidery Stand Diy Embroidery Hoop Stand Embroidery Hoop

Needlework And Needlepoint Frames And Floor Stand Framed Cross Stitch Frame Embroidery Needlepoint Tapestry

Tambour Frame Stand Made By Me Bastidor De Bordar Bordados Pedreria Disenos De Bordados
Embroidery Hoop Stand Etsy In 2021 Embroidery Hoop Hand Quilting Frames Diy Embroidery Hoop Stand

Embroidery Stand Swift Stitching Frame Cross Stitch Frame Etsy In 2021 Diy Embroidery Hoop Stand Framed Cross Stitch Cross Stitch
I would like to provide you some suggestions for hooping satin jackets for machine embroidery. We do not want topping for satin jackets because it is a steady fabric, not like sport shirts and t-shirts which are knits and stretchy. Hooping satin jackets is among the trickiest little jobs for the brand new embroiderer to master. The design placement on the jacket again have to be just right - not too low or high - and it have to be straight. For placement, one rule of thumb is to put the bottom of the lettering (if using an arc, measure for the letter on the top of the arc) seven inches down from the collar seam. Another is to put the design's heart at roughly 9 or 10 inches down from the collar seam. (This is only a guideline. If that you must, get a sewout of the design or photocopy the precise dimension and lay it on the jacket to determine one of the best placement.) To get the design straight, lay the jacket flat and easy, and utilizing clothespins, connect a yardstick under every sleeve the place the seams come together. Draw a line with tailor's chalk or cleaning soap for the horizontal placement. Make a midway mark on this line to point out the center. Be sure to double-check these measurements along with your eye - jacket making is just not an exact science and generally it's important to adjust a technique or another to make up for discrepancies in measurements.
Janome designed the Memory Craft 9700 to convey together all the best options into one sewing machine. The MC9700 has the facility and precision of a superior sew mechanism mixed with the sophistication of computerized control. You get the precision stitching Janome is thought for along with simple navigation and design structure on a color contact display screen. The Memory craft 9700 can convert from a sewing machine into an embroidery machine in seconds. In contrast to different manufacturers that require separate attachments and quite a few steps the 9700 has a built-in, two-step conversion. Simply touch the embroidery mode key then connect the embroidery foot and one minute it is a stitching and quilting machine the next an embroidery machine.
Deanne Blackhurst is a contract writer for Dee's Pink Works, an online site that specializes in Redwork and Cross Sew patterns. Using the traditional redwork style as inspiration, these new patterns are moderately priced and have a enjoyable classic really feel but with a contemporary perspective. At Dee's Crimson Works you will discover traditional units that feature the Days of the Week and charming Solar Bonnet Women as well as the more present Cheese and Wine assortment and Celtic Knots. They also carry thread and notions particularly designed for redwork and cross stitch. Go to them at Dee's Red Work Inc [http://www.dsredwork.com] and find a pattern you can't resist.
Comments
Post a Comment